For thousands of years the permanence of concrete has made it an ideal construction and design medium for architects, engineers, and builders. Even the word “concrete” is often used as an adjective to describe the reality, longevity, and durability of everything from objects to ideas. Despite this long and proven track record, some of the latest design and repair trends in overlays, toppings, and coatings have revealed a critical fail point in that concept of permanence; Surface Preparation.
“By failing to prepare, you are preparing to fail.”
– Benjamin Franklin
Adequate surface preparation is rarely as appealing as applying that last coat of sealer and admiring your creation. It doesn’t receive any fanfare and rarely makes the cover of trade magazines yet it is the most important aspect of any project and can quickly undo the deft and skilled hand of any artisan. Due to its often dull and monotonous nature, it is often neglected or overlooked. The large majority of neglect comes from good installers that have a specific surface prep standard that they follow for every job without ever having a comprehensive understanding of how or why. This leaves the very broad variety of slabs and substrates treated exactly the same, despite their differences, and many variables unanswered.
99% of the bond failure issues I have inspected have either been poor or incomplete surface prep. Proper surface preparation is more that repetition and consistency. Just like preparing for an exam, job interview or business meeting, good preparation is about having the answers before they are asked. With overlays and toppings, good preparation means reading the substrate, knowing the materials, identifying all possible variables and accounting for them one by one. Doing this effectively ahead of the installation will eliminate most, if not all, opportunities for failure.
The current industry environment is one of open communication and free information with many of the pioneers that developed the installation processes for all of these materials. The combined years of know-how and experience in the room can be utilized to eliminate any and all surprises.
Let’s first discuss the goals, then we can discuss the steps required toward achieving them. The result of proper surface prep should provide a clean, sound and open substrate that is ready to receive uniform coat of the desired topping.
Clean and Sound
This generally means that the substrate is free of contamination, previously applied coatings, lose debris and that all cracks, spalls, voids, depressions, etc…. have all been addressed and repaired. Each of these repair subjects are fairly broad and require a much deeper dive than can be made in this article but the basic principle is to provide and environment in which the entire final topping can cure consistently and properly. Most of the materials that we are discussing cure through a chemical reaction. The rate at which this occurs increases as the mass increases. This means that doing your repair, leveling and final finish in one coat will result in differential curing throughout due to the varying thicknesses of material. Most, if not all of these differences will be visible as “shadows” in the final finish.
Surface Profile
The major mechanisms for a long-lasting bond between existing concrete and an overlay are the adhesive properties of the overlay material and the mechanical bonding properties between the two materials. By far, the most effective way to maximize these is with adequate profiling of the surface. There are many methods of profiling a concrete surface; the most common are mechanically abrading, blasting with abrasives, chemically etching, and high-impact mechanical methods such as jackhammers and scabblers. The preferred methods are mechanical abrasion and blasting. Chemical and high impact methods increase risk of micro-cracking and residual byproducts left behind in the substrate. Although they both have their place it is best to consider those a last resort when either of the former two are available. Effective profiling accomplishes two things: 1) Increasing the effective surface area of the concrete, 2) Opening and exposing of pores and cavities in the concrete surface.
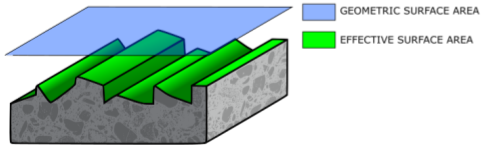
This figure illustrates how proper surface profiling can increase overall effective surface area and interface between the overlay and substrate despite no change in geometric surface area.
1) Effective Surface Area vs Geometric Surface Area
One good analogy to describe the difference between the two is the comparison of Texas to Colorado. Looking at a map, it is clear that the geometric surface area of Texas in terms of square miles is over double that of Colorado. Yet, if you were to flatten all of the mountains and valleys of Colorado it would have the same effective surface area as Texas. When concrete is profiled millions of asperities are created in the form of peaks and valleys, expanding the overall interface between the two materials along multiple planes and axes. By definition all bonding, and material properties that effect bonding, occur at this interface; so the bigger the better.
2) Exposing Pores on the Concrete Surface
Concrete is an inherently porous material. Through the placement and finishing process capillaries and voids are formed throughout the matrix as air is entrained, mix water migrates, and water evaporates. The final finishing stage closes off these capillaries just at the surface of the concrete. Removing the surface layer exposes openings and pores allowing overlays and coatings to firmly anchor to the existing concrete by working into the voids and curing into the substrate as a monolithic structure.
Properly exposed pores create the environment necessary for the other factors that directly attribute to overall bond strength: moisture content of the substrate, overlay material physical attributes.
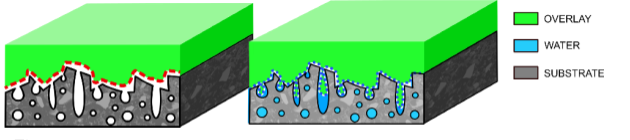
The figure on the left illustrates the reduction in effective surface area when a lack of substrate saturation is combined with cementitious mix with a low water to cement ratio. The figure on the right illustrates the increase in effective surface area when the substrate is properly saturated and cementitious material is properly installed.
Figure 2 illustrates how both overlay rheology and substrate saturation can impact final bond. Although this example is primary illustrating a water prime, the physics remain constant for most overlays and coating regardless of priming method. In this priming example we the industry standard is “SSD” or Saturated, Surface Dry. This means that all of the substrate pores and capillaries are saturated with water but there is no water on the surface. This prevents a “thirsty” floor from robbing the overlay material of needed hydration water but doesn’t contribute any significant amount of water to the mix, effectively creating a moisture-neutral surface.

Due to their polarity, water molecules have the useful characteristic of connecting to each other via hydrogen bonds. When the water in a cementitious overlay comes into contact with the water within the substrate these covalent bonds draw the mix water, along with cement and aggregates, into the pores creating a strong mechanical bond between the two. If the overlay or the substrate are not adequately saturated then a moisture differential is created in which water migrates away from where it is needed. This is why primers or slurry coats are called for when low W/C ratio overlays or patch materials are needed.
Identifying Surface Profiles
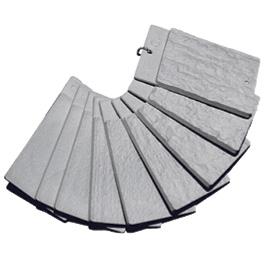
The final question to answer now becomes “what is the proper surface profile?” Most turn to ICRI for guidance. The International Concrete Repair Institute focus is repair, but the first and most critical step of any repair is surface preparation. To take the guessing game out of surface preparation, ICRI created the Concrete Surface Profile Chips, also known as ICRI CSP chips. These are a set of rubber plaques numbered 1 through 10 that show properly prepared concrete ranging from almost smooth to extremely rough. The chips, along with the accompanying booklet, establish a third-party guideline for what properly prepared concrete should look like, how to achieve the desired level of surface preparation, and which profile is best for a particular overlay or coating system. These chips have now become a standard reference for manufacturers of most systems.
Overlays can present a daunting challenge to many contractors because of a perceived liability or risk of failure that they present. The goal of this article is to dispel that perception. There many installers that utilize these materials on a daily basis with a very low failure rate largely because an acute understanding of how all of these pieces come together. These are not works of art that require any inherent gift or talent to be executed but they do require a high degree of technical discipline. While there is a basic outline to getting the best results, the key is identifying the project-specific variables and tailoring specific solutions to achieve the principles discussed here. Even high-performance, ultra-modified materials cannot replace the careful consideration and attention to detail required for proper surface preparation.
About the Author

Jason Ryan | Materials Specifications Specialist at Cement Colors
jryan@cement-colors.com | 817-807-5572
2 Responses to “Concrete Surface Preparation – Eliminating Opportunities for Failure”
Comments are closed.
May 16, 2020 at 3:40 am, Alicia Byrne said:
I agree with you that having a proper surface prep can make it easier for the topcoat to be applied uniformly. My friend is thinking of remaking her kitchen and bathrooms to a more concrete-based design because she thinks it’s more modern. I will definitely let her know that she should make sure her concrete surface is prepped nicely so that she can have a beautiful finish.
July 10, 2020 at 4:36 pm, Cement Colors said:
That’s great Alicia! Please don’t hesitate to reach out if you or your friend have any questions.